Showing posts with label Pinterest made me do it. Show all posts

Wednesday, January 9, 2013

Photo Cube Block Puzzles

I really used to have free time once in a great while before Pinterest. Now I either pin stuff I want to do or do things I pinned.

Anyway, I saw these cute photo cube block puzzles and knew I'd have to make myself a set or 2 (or 3). I think I will take these to work and let the students play with them when they are chilling in my office.

You will need six 2" wooden cubes and six 4"x6" photos. You will also need Mod Podge, an applicator, a small sharp blade, and either a fan, hair dryer, or a LOT of spare time.

First, you are going to arrange your cubes into a 2x3 pattern. Then coat the tops with Mod Podge.

Put your picture on top of all 6 cubes and press firmly to get out any air bubbles. Then coat the top of your photo with a thin but even layer of Mod Podge.

Speed up the drying process with a fan or hair dryer. Or wait for a good long while for it to dry between steps.
Ignore all that gunk on my hairdryer. It's probably toothpaste. My kids can get toothpaste on ANYTHING.
 Now cut the blocks apart using your blade. Try to get it as exact as possible or they won't fit together as well in the end!

Flip the cubes to an uncovered face and repeat the steps until all 6 faces are covered. Then go back and recoat all the photos with Mod Podge because you may find they like to stick together if they aren't completely dry in between steps

Assemble your puzzle and enjoy! When you get bored with it, flip the pictures and you have something new to look at. Wouldn't these make fantastic gifts? And super cheap too - less than $1 to get the photos printed and maybe $5 for the blocks!
Yay! Now I can see 18 of my favorite pictures of them whenever I want!
*Stuff I didn't tell you:
1) I really hate Mod Podge. It gets EVERYWHERE! How do people use it and not have it stuck all over their hands? Maybe I just have no patience...
2) These things really do need a lot of drying time between steps. If you rush it, they are not going to turn out nearly as pretty as you want them to be.
3) I used real photos printed on real photo paper by a real photo counter (ok, the drugstore, but it wasn't home printed!) If you used regular paper on these you really want to make sure every thing is super dry before the next step. While I think you probably could make these with a thin paper, I also think they would tear super easy and you'd just be left with a gloppy mess.
4) My photography skills suck. I have discovered that this is what sets you apart on Pinterest - if you have an expensive camera and can take really good pictures, people will think you are an amazing crafter. I think everyone's projects really DO look just like yours does, they are just better at taking pictures to make it look perfect!

Saturday, December 29, 2012

Spook Towne, USA

(Yes, it's December and I'm posting about Halloween. I just went back into drafts and found this)

We had a Spooktacular Halloween this year, even though my little goblins were bummed because I told them they are now too old to go Trick or Treating. But it's ok, Pinterest and Nana to the rescue! 

Mummies in a blanket, witch hat pizzas, Jack-o-Lantern fruit cups

Bubbling cauldrons and Witches' Brew. Who knew they sold dry ice at the grocery store?!


Dracula made a guest appearance.

We even played Halloween bingo
and Stick the Spider in the Web!


If you want to see the recipes we used, they are all in my Halloween board on Pinterest.

Thursday, December 27, 2012

One Horse Sleigh

You know how it is. You need that perfect gift for your coworkers, your kids' teachers, the neighbors, etc. But you don't want to break the bank to make everyone feel special. I spent years trying to come up with clever gifts.

And then the internet invented Pinterest.

So when I found these on there, well you know I had to pin and make them! Here's my source pin.

You are going to need candy canes, a wide, flat, rectangular candy bar (KitKat works great - Hershey bars might work too), and some candies for packages. I used the Hershey Miniatures like my inspiration blogger did, but as I was making them I stated thinking you could probably use the Nuggets or maybe even some other mixed assorted candies. 

You also will need some ribbon or wide string and a bow or something to go on top. And an adhesive. I used hot glue. Some people have had success using glue dots (like for scrapbooking). I am cheap. I had hot glue on hand already and I was shelling out a lot of money for candy!


To do the sleighs the way I made them, you will need for each sleigh 2 candy canes, 1 KitKat bar, 10 Minis, 18" of ribbon, and a Hershey's kiss (to go on top).

First, glue the candy canes to the bottom of the KitKat. Leave the curves part out or your presents won't have room.

Now start layering your candies. I went with 4, 3, 2, 1. You could do 3, 2, 1 and it would still look pretty good and be a little cheaper in the long run.

I just put a little dab of hot glue on the bottom of each candy. I don't think they melted any. No one mentioned it if they did. If you got one of these from me and it was melted or ooky, leave a comment so we'll know!

I did put ribbon around these and glue a Hershey Kiss on the very top, but I forgot to take a picture. They turned out super cute though and I really liked them!

Wednesday, December 26, 2012

Easy Lined Zipper Pouch Tutorial

So I'm a little bit thrifty. Note to all you rich people out there: that means I'm poor but I refuse to be labeled as such! And I have about 8 million family members on my shopping list. But just because you are not loaded doesn't mean you can't give nice gifts! Enter the Easy Lined Zipper Pouch!
You love my spiffy bath towel backdrop, right? Yeah that was the first thing I grabbed from the linen closet.

Now some of you might be intimidated by this project. Let me assure you, if you own a machine, can thread it, and make it stitch, you can make these. Even the zippered part. I promise, they aren't hard in the least!

Here's what you're gonna need materials wise:


I'M FAMOUS!

Ok, not really. But I noticed that my web traffic was picking up and it was coming from...

DUN DUN DUN.....

PINTEREST!!!!!

WOOOOO I have made the big time now! Somebody pinned me on Pinterest!

Then I noticed I haven't actually added any new content since October. Oops.

BUT I have about a zillion pictures on my phone I need to upload and blog about so maybe I'll get those going. And I've got 5 or 6 drafts I could edit and publish. So for my new stalkers, WELCOME! (And yes, I am totally crazy)

Monday, September 24, 2012

Settle Down Jars

Oh Pinterest. Why must you torment me thus?

So I saw these on Pinterest and knew I had to make them for myself. Because really, who isn't mesmerized by slowly swirling glitter? Plus I knew these could have all kinds of applications both in a school setting and in a therapeutic one. One trip to the Dollar Tree later and I was ready to go! (Side note, I also borrowed ideas for these from here, here, and here. Give credit where credit is due people!)

These are super simple to make. I managed to a) make 2 prototypes, b) upload pics, and c) type this blog post in about 90 minutes worth of time. Oh and break up a fight between my kids. And feed the cat. And switch the clothes over to the dryer.

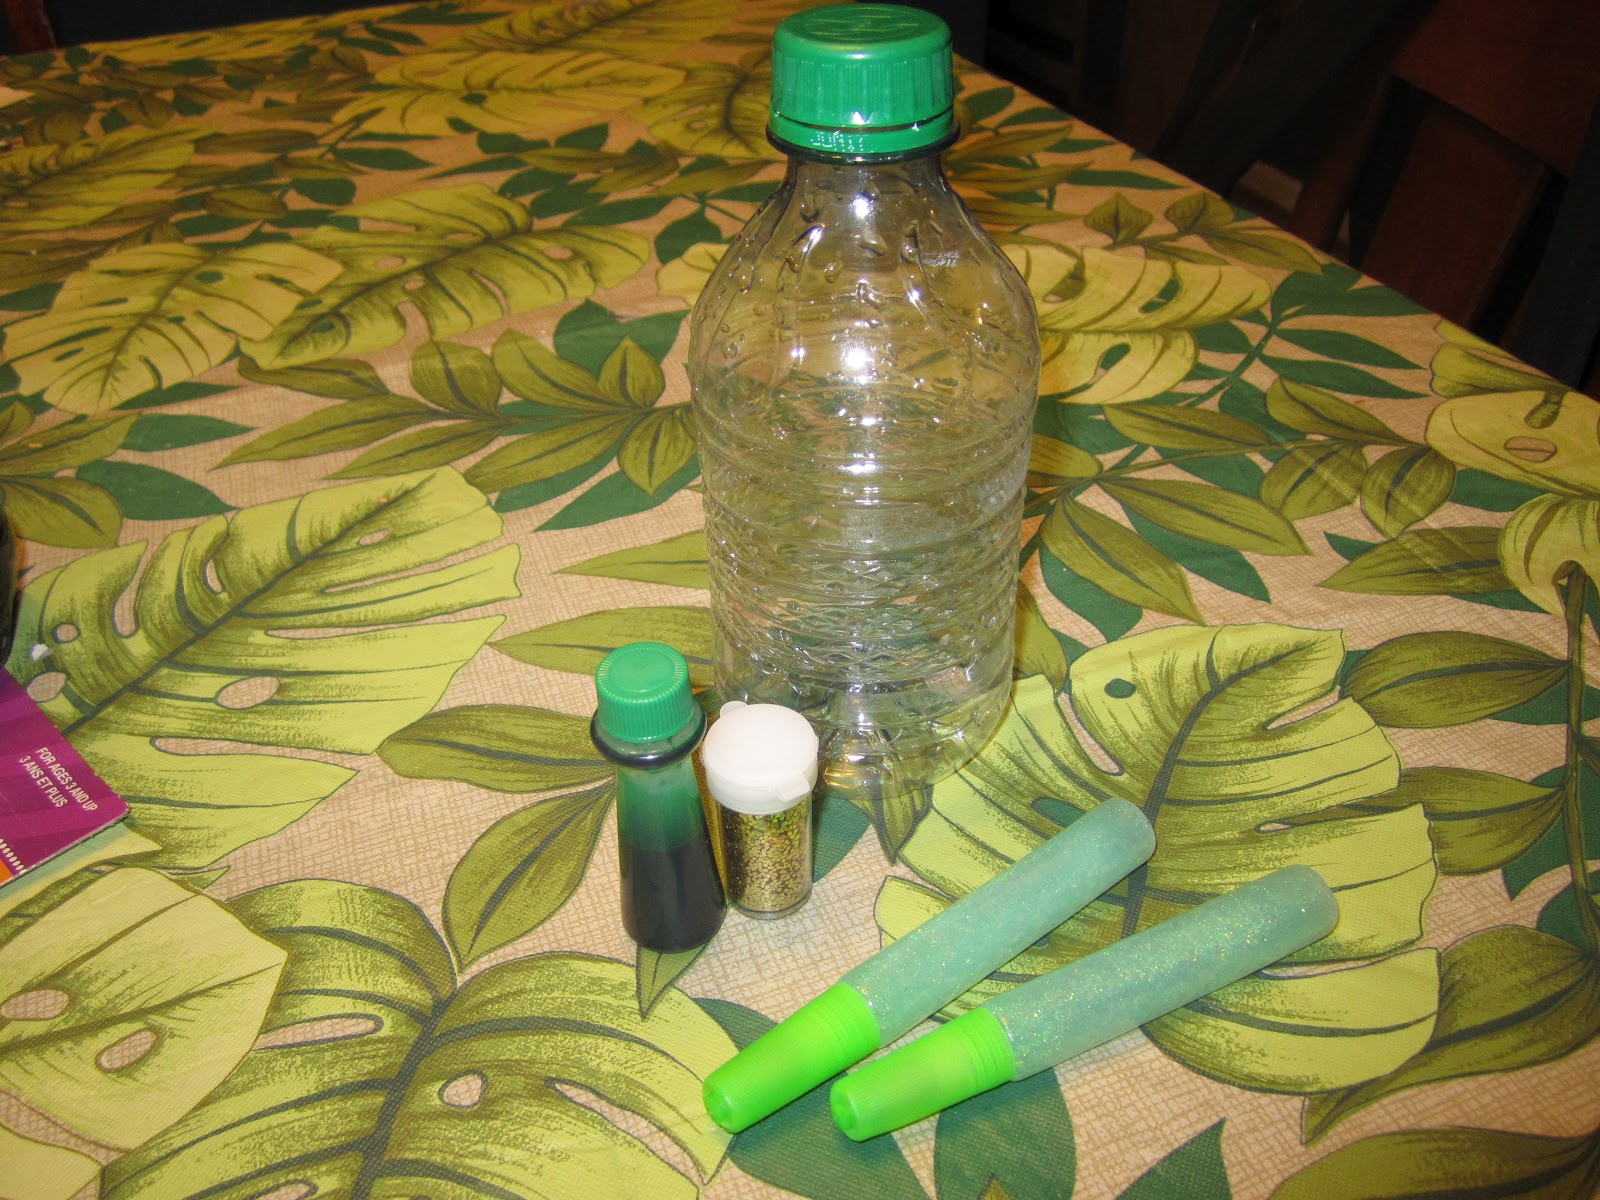
You are going to need some supplies that you may or may not already have on hand. I am not a big fan of glitter because every time I use it I end up looking like Lady Gaga threw up on me. But if you already have glitter and/or glitter glue at home this project might be super cheap/free! You will need:

  • Glitter glue
  • Loose glitter
  • Hot water (really hot, almost boiling)
  • A clear container that can be sealed to be leak proof (Mason jar, water bottle, etc)
  • Food coloring/dye
  • Super glue (or other permanent adhesive because you do NOT want your kiddos to open this sucker once you get done with it)
  • MAYBE some clear gel glue (like Alene's Clear Gel Tacky Glue) - this depends on how much glue is in your glitter glue and how long you want it to take to settle


Ok back to the Dollar Tree. Normally I don't allow myself to go into the Dollar Tree because when you buy 20 items at a time it's not the cheap store anymore. Especially when you only needed 2 or 3 of those items but Pinterest has convinced you that you are the world's greatest crafter so go ahead girl, cause you got this! But today I had some restraint (translation: pay day is still a week away) and managed to only spend $7. Ok, it was $8, but a dollar of that was for this cool flip top coffee tumbler I found. I'm addicted to those now. That's a separate post though.

Yes, I bought a Cherry Coke at the Dollar Tree. I needed a clear plastic bottle to experiment with!
So it turns out at the Dollar Tree they have 2 kinds of glitter glue. They have a giant (1.8oz) bottle size that comes in a 3 pack and they have a small (0.33oz) tube version that comes in a 10 pack. Your Dollar Store of choice might have something different, or they might not have it at all. Mine is pretty awesome (and also on my way home from work) so they had it. I also got some small jars of loose glitter because the glitter in the little tubes is REALLY fine and I wanted to be sure it was all pretty and shiny and whatnot.

So I decided to try the mason jar one first. I didn't get as many good "construction" photos with it because I was still figuring out what the heck to do. Luckily I had read on someone's comments that the water needed to be really hot so the glue would dissolve. This is true - if your water cools off before you are done adding glue just pop it back in the microwave and heat it back up!
Microwave that water! 3 minutes ought to do it.

I poured the super hot water into the jar until it was about 3/4ths of the way full (leave room to add stuff!) Then I squeezed in and entire bottle of the red glitter glue (the 1.8oz size). It was really clumpy and gloopy looking. Then I added a small container of loose silver glitter. Since this was in the mason jar, I grabbed a plastic spoon and mixed it up. 

Glitter + Glue? No way I was using a "good" spoon to mix!
See how swirly and Christmasy that looks? Well one thing I noticed right away was that the loose glitter (silver) was a LOT bigger than the glitter glue glitter (red) so it was settling a lot faster. So I think next time I would buy fine glitter instead of big.

Then I added red food coloring. You could probably skip that if you wanted to, but it looked a little too transparent to me and I wanted it to look really interesting. I probably put too much (about 8 drops) because when the jar is completely settled it looks like a jar of blood. But it's a jar of GLITTER blood, so that makes it ok, right?

Ignore that other crap on the table and the fact that my camera only cost like $60. Pretend this is one of those awesome shots that those other people post, ok?
This jar clocks in at about 10 minutes from shaken to pretty much settled. It's completely settled in about 20 minutes, but you can tell a big difference after 10, so I'd call it a 10 minute timer

At this point my kids had already left for Cub Scouts (thank you male bonding time!), so I decided I had one more in me tonight. Plus I had all these glitter supplies laying around...


This time I decided to use the small (0.33oz) tubes of glitter glue. I thought that green with gold loose glitter would look nice. Well it probably would have it the green glitter had been darker or the gold glitter had been smaller. It still turned out ok though.

After heating up the water, I dumped in the glitter glue and the loose glitter. Since this one was in a bottle, I screwed the top on and shook it. I was skeptical that it would mix and distribute the glue, but it did ok.

I didn't use the Cherry Coke bottle. I wasn't done drinking it and I didn't really feel like chugging it down. So I stole my kid's half full 12oz water bottle and dumped out the water.

Be REALLY careful mixing this - the water is super hot and you can't just grab the bottle with your bare hands and shake away! Well I couldn't anyway. I had to use a pot holder.
This one settled REALLY fast. Part of the problem with that was the gold glitter is so much bigger and darker than the green so it looks settled faster. The other problem was that 0.66oz of glue is not a lot of glue. I had to add about another ounce of the clear tacky glue to get it to settle slower. But it's still a lot faster than the red one (about 4 minutes). Once I added the green food coloring I liked it better.

Looks like a fairy Sundrop, right?
Here's what I will do differently next time:
  • Small loose glitter instead of the bigger size
  • Less food coloring so my water color isn't so intense after the glitter settles
  • Work with the water to glue ratio to better control the time variable
  • Remember that the cheap glue tubes take more clear glue (which I already had but isn't exactly cheap) so maybe consider using 4 or 5 tubes instead of just 2
But all in all, I'm pretty pleased with the outcome. What do you think?
Bonus points if you can spot 2 other crafting projects in this picture I've blogged about!

Friday, March 2, 2012

Macrame Cords

I saw these cute earbuds wrapped in embroidery floss on Pinterest and found a link to a blog that clearly shows how to make them via a GREAT tutorial that even includes video! So I made some.
Totally cute, right? AND it keeps them from tying themselves in knots in my purse!
Then I made another one.
The Kindle is totally rocking out in style now!

Then I decided to wrap the power and A/V cords for all the different electronics in coordinating colors so I would always know which cords went to the Wii, which to the computer, etc. Yeah, I went overboard. Big surprise, I know.

I'm using yarn for the bigger cords because a) it's cheaper than 5 billion skeins of floss it would take and b) I didn't want to be tying little bitty knots for all eternity (even though that's how it feels!). Oh and c) I have a ton of yarn from my yet-to-be-completed project of teaching myself to knit and/or crochet. I'll do another post when I get them done so you can ooh and aah over them.

Thursday, February 16, 2012

Crayon Canvas Art

I saw it on Pinterest and thought "this is the coolest thing EVER and I HAVE to have one on the wall at the end of my hall between the kids' rooms. That's right, it's the melted crayon canvas!

So I looked around until I found this awesome tutorial on the Whatever blog (seriously, check that blog out. I need more hours in a day so I can do all that cool stuff).

Basically, you just hot glue crayons to a canvas and heat them with a hair dryer until they get all melty and splatter or drip down your canvas. Then you hang it up and go blog about it! Yay!

Wednesday, February 8, 2012

Mod Podge Picture Frame

I decided I was going to learn to love Mod Podge. So I bought some. I got glossy, and now I wish I had gotten matte. Anyway, apparently I can think of a million different things to make with Mod Podge.

I bought a cheap wooden frame in the kids craft section at Wal-Mart for $1. I decided I wanted to Mod Podge with fabric. So I dug in my fabric stash and pulled out the CUTE yellow, black, and grey strips I was saving to make towel appliques with. I only needed a little bit of fabric, so I was ok with dipping into it.
Is this not the best fabric EVER?!