Pages

Saturday, December 29, 2012

Spook Towne, USA

(Yes, it's December and I'm posting about Halloween. I just went back into drafts and found this)

We had a Spooktacular Halloween this year, even though my little goblins were bummed because I told them they are now too old to go Trick or Treating. But it's ok, Pinterest and Nana to the rescue! 

Mummies in a blanket, witch hat pizzas, Jack-o-Lantern fruit cups

Bubbling cauldrons and Witches' Brew. Who knew they sold dry ice at the grocery store?!


Dracula made a guest appearance.

We even played Halloween bingo
and Stick the Spider in the Web!


If you want to see the recipes we used, they are all in my Halloween board on Pinterest.

Thursday, December 27, 2012

One Horse Sleigh

You know how it is. You need that perfect gift for your coworkers, your kids' teachers, the neighbors, etc. But you don't want to break the bank to make everyone feel special. I spent years trying to come up with clever gifts.

And then the internet invented Pinterest.

So when I found these on there, well you know I had to pin and make them! Here's my source pin.

You are going to need candy canes, a wide, flat, rectangular candy bar (KitKat works great - Hershey bars might work too), and some candies for packages. I used the Hershey Miniatures like my inspiration blogger did, but as I was making them I stated thinking you could probably use the Nuggets or maybe even some other mixed assorted candies. 

You also will need some ribbon or wide string and a bow or something to go on top. And an adhesive. I used hot glue. Some people have had success using glue dots (like for scrapbooking). I am cheap. I had hot glue on hand already and I was shelling out a lot of money for candy!


To do the sleighs the way I made them, you will need for each sleigh 2 candy canes, 1 KitKat bar, 10 Minis, 18" of ribbon, and a Hershey's kiss (to go on top).

First, glue the candy canes to the bottom of the KitKat. Leave the curves part out or your presents won't have room.

Now start layering your candies. I went with 4, 3, 2, 1. You could do 3, 2, 1 and it would still look pretty good and be a little cheaper in the long run.

I just put a little dab of hot glue on the bottom of each candy. I don't think they melted any. No one mentioned it if they did. If you got one of these from me and it was melted or ooky, leave a comment so we'll know!

I did put ribbon around these and glue a Hershey Kiss on the very top, but I forgot to take a picture. They turned out super cute though and I really liked them!

Wednesday, December 26, 2012

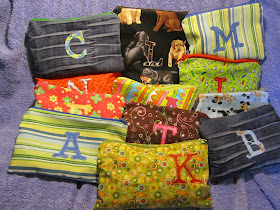
Easy Lined Zipper Pouch Tutorial

So I'm a little bit thrifty. Note to all you rich people out there: that means I'm poor but I refuse to be labeled as such! And I have about 8 million family members on my shopping list. But just because you are not loaded doesn't mean you can't give nice gifts! Enter the Easy Lined Zipper Pouch!
You love my spiffy bath towel backdrop, right? Yeah that was the first thing I grabbed from the linen closet.

Now some of you might be intimidated by this project. Let me assure you, if you own a machine, can thread it, and make it stitch, you can make these. Even the zippered part. I promise, they aren't hard in the least!

Here's what you're gonna need materials wise:


I'M FAMOUS!

Ok, not really. But I noticed that my web traffic was picking up and it was coming from...

DUN DUN DUN.....

PINTEREST!!!!!

WOOOOO I have made the big time now! Somebody pinned me on Pinterest!

Then I noticed I haven't actually added any new content since October. Oops.

BUT I have about a zillion pictures on my phone I need to upload and blog about so maybe I'll get those going. And I've got 5 or 6 drafts I could edit and publish. So for my new stalkers, WELCOME! (And yes, I am totally crazy)